Login Methods
Sinequa supports different authentication protocols, involving different web services and processes. The general process of login (including authentication and initialization of the app) is managed by the LoginService provided in the @sinequa/core/login library.
The authentication process depends on the following parameters:
- The authentication protocol: Default (Login/Password), Windows Single Sign-On, SAML2 or OAuth2.
- Where the SBA is hosted: On the Sinequa server, or somewhere else (via CORS or proxy).
- Whether the Sinequa server is accessed over HTTP or HTTPS.
- Some browsers may also behave differently.
Authentication protocols
The goal of authentication protocols is to guarantee that each HTTP request comes from an identified user who has a certain set of permissions. Authentication can be managed either by Sinequa or by the web server (IIS):
-
Sinequa handles authentication for Login/Password, SAML2 and OAuth2 (IIS is configured with Anonymous authentication, meaning it just lets requests go through to Sinequa).
-
IIS handles authentication for Windows Single Sign On (NTLM or Kerberos protocols). In this case, Sinequa lets IIS do all the work, and it gets the user's id from IIS itself (
LOGON_USERvariable).🛈 In that sense, Windows authentication is convenient. However, it can also prove to work erratically, and differently from one browser to the other. We generally recommend using more modern protocols like SAML2 or OAuth2.
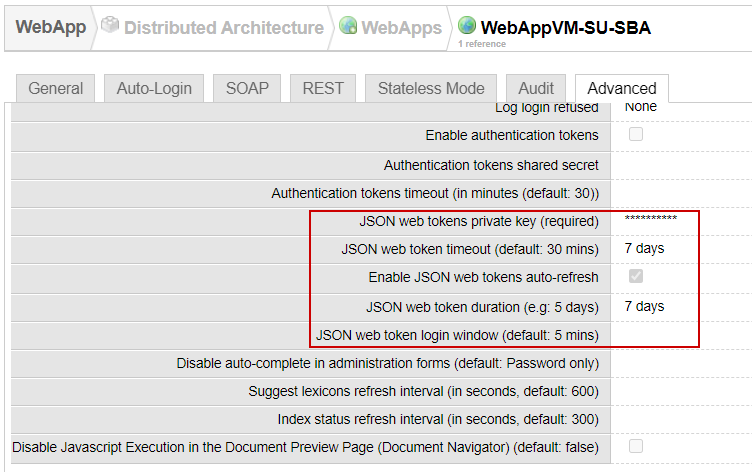
When Sinequa handles authentication rather than IIS (normal situation), it emits a JSON Web Token (JWT) that the SBA stores in a cookie (sinequa-web-token or sinequa-web-token-secure, depending on the protocol). The settings for the JWT are found in the Webapp settings (Advanced tab). In particular it is possible to increase the life span of the tokens and to automatically refresh them, to let the user be authenticated for a longer period.
The JWT is sent with every HTTP(S) request via the sinequa-web-token cookie. This allows Sinequa to know the identity of the user. When the token expires, Sinequa returns 401 errors (Unauthorized). Upon receiving this error, the SBA re-initiates the authentication process (the user does not see these errors because they are intercepted by the LoginInterceptor provided in the @sinequa/core/login library).
In the case of the SAML or OAuth protocols, an external service must authenticate the user. The browser navigates out of the SBA to this Identity Provider (for example, Google's Single Sign On). Then the browser navigates back to the Sinequa server, which redirects again to the Sinequa SBA, while delivering the JWT cookie.
The general login process is depicted in the following diagram (depending on the authentication protocol, only a subset of this diagram is relevant for a given application):
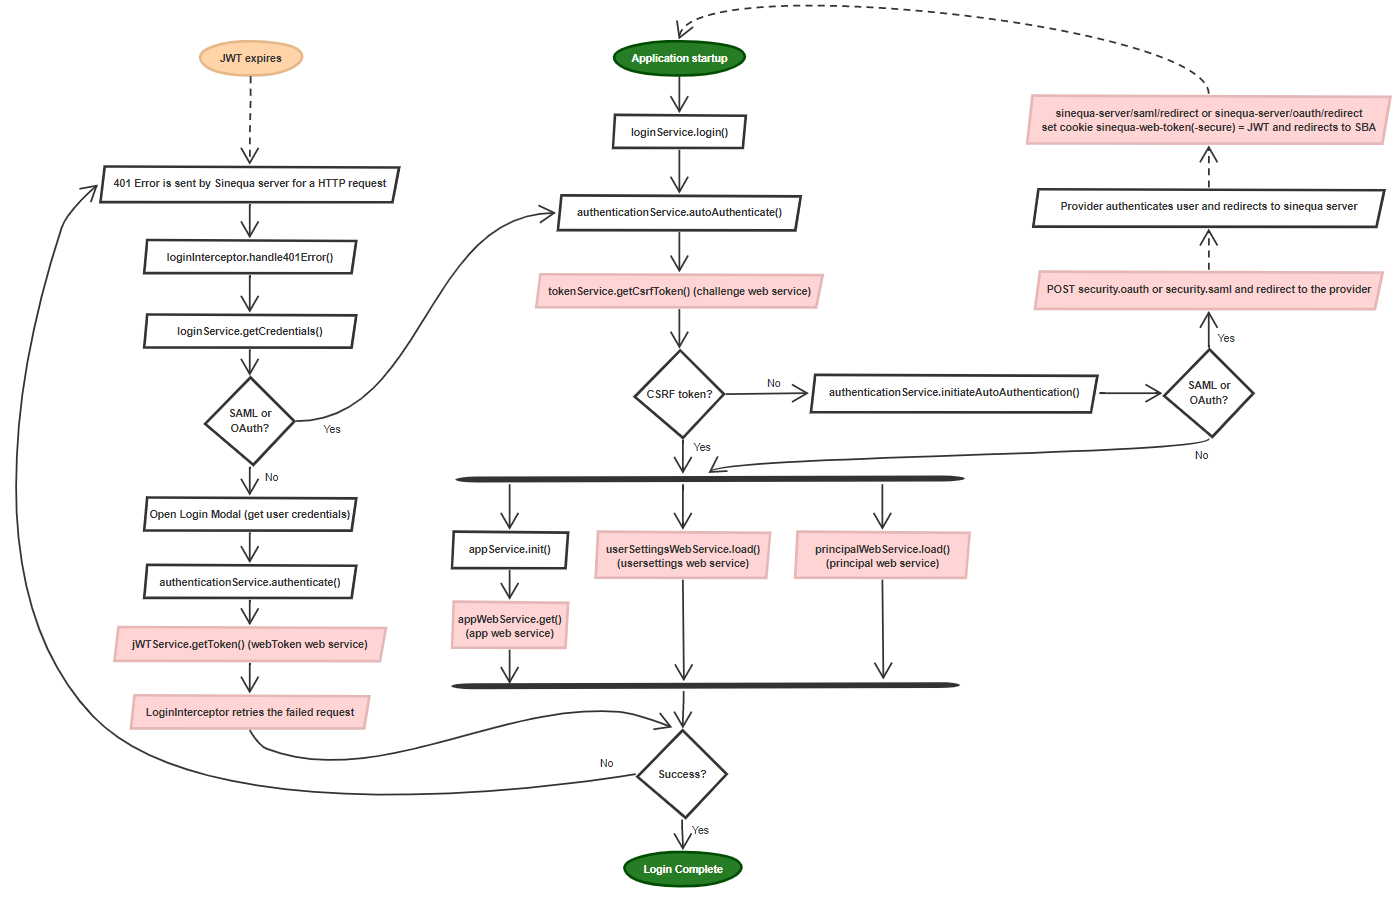 Red boxes represents calls to Sinequa web services
Notice that the Login process includes a call to three web services: app (configuration of the app and its web services), principal (identity of the user, typically from a directory), usersettings (user data, including baskets, saved queries, etc.). The login process is considered complete when all 3 services have downloaded this data and are initialized.
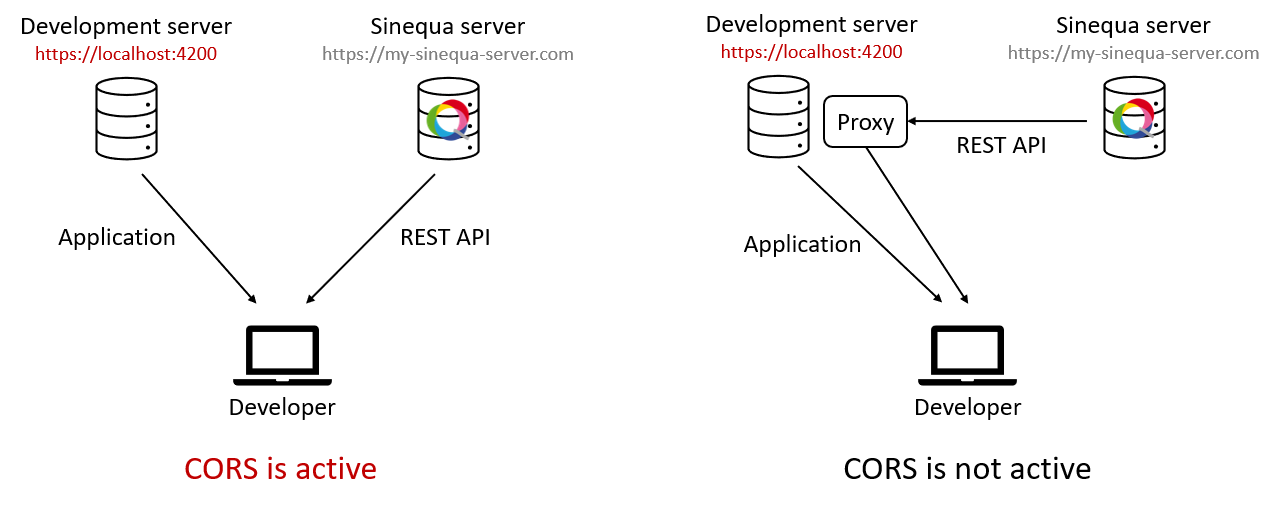
SBA Hosting: CORS or not CORS
Cross-Origin Resource Sharing (CORS) is a mechanism that allows using web services from third party sources. CORS is active when a request is sent to a URL with an origin different from the URL in the browser. For example:
- If your website is hosted on
https://example.com/myappand makes a HTTP GET request tohttps://example.com/api/examples/42, the two URLs have the same origin, so CORS is not active. - If your website is hosted on
https://example.com/myappand makes a HTTP GET request tohttps://cool-service.com/api/examples/42, the two URLs have a different origin, so CORS is active.
The problem with CORS is that, when active, the browser restricts a number of functionalities. For example, in some cases it is not possible to store cookies (that are used for authentication) and it is not possible to interact with iFrames (that are used for document previews).
CORS may be an issue depending on where your SBA is deployed:
-
When your SBA is deployed on a Sinequa WebApp, there is no problem because CORS is not active: The application's URL (
https://my-sinequa-server.com/app/my-sba) has the same origin as the application's API (https://my-sinequa-server.com/api).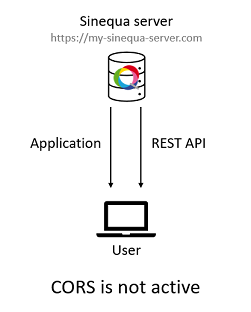
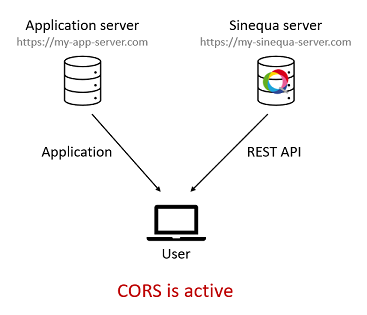
-
However, if your SBA is deployed on a different domain (
https://my-app-server.com), CORS is active and you might run into some issues, which can interfere with the login process (particularly with HTTP instead of HTTPS). When the SBA is hosted on a different server, theurlof the Sinequa server must be specified in theStartConfigobject (defined inapp.module.ts):export const startConfig: StartConfig = {
app: "my-app",
url: "https://my-sinequa-server.com",
production: environment.production
};
-
Another case where CORS can be active is during the development of the app. Using
ng servemeans your app is deployed on a local server (by defaulthttp://localhost:4200), but the Sinequa API is somewhere else (for examplehttps://my-sinequa-server.com/api).Since this is a common situation, Angular CLI includes a way to proxy the Sinequa API as if it were hosted on the development server. Instead of running
ng serve my-app, we simply runng serve my-app --proxyConfig=./path/to/proxy.json, with a proxy file looking as follows:proxy.json{
"/api": {
"target": "https://my-sinequa-server.com",
"secure": false,
"changeOrigin": true
}
}When this proxy is enabled, requests that are sent to
http://localhost:4200/apiare forwarded tohttps://my-sinequa-server.com/api. From the browser's point of view, everything comes fromhttp://localhost:4200(both the app and the API), so CORS is not active.
Note that when the URL of the server is defined in a proxy file, it should not be defined in StartConfig object. In fact if you define a url in your StartConfig, it cancels the effect of the proxy: the requests will be sent to the url, thus activating CORS.
HTTP vs HTTPS
Another parameter which can influence login protocols is whether you use HTTP or HTTPS for your Sinequa server. The table below summarizes the compatibility for the different protocol we support. We generally recommend using HTTPS, as it is more secure and suffers less restrictions from the browser than HTTP.
| HTTP | HTTPS | |
|---|---|---|
| Default (Login/Password) | ✔️ Compatible (with CORS inactive*) | ✔️ Compatible |
| SAML 2.0 | ❌ Incompatible | ✔️ Compatible |
| OAuth 2.0 | ✔️ Compatible (with CORS inactive*) | ✔️ Compatible |
| Windows Authentication | ✔️ Compatible | ✔️ Compatible |
When CORS is active, the browser requires Cookies to be stored with the SameSite=None attribute, which also requires the Secure attribute, only available with HTTPS. So effectively, it is not possible to store our JWT with HTTP + CORS.
Windows Authentication does not require storing a JWT, so it is not affected by this problem.
Note that with HTTP the cookie storing the JWT is named sinequa-web-token, and with HTTPS it is named sinequa-web-token-secure.
In development mode, with ng serve, you can serve your application over HTTPS with the --ssl=true option. You should generally use this option if your Sinequa backend is served over HTTPS too, even though it is not mandatory (except for SAML authentication for example).
Setting Up Login Methods
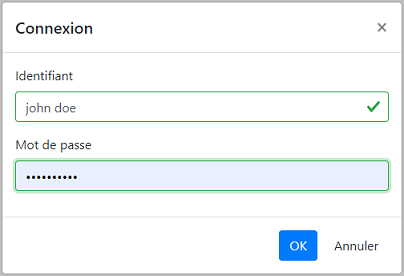
Default form (login/password)
By default, if no login method is configured, you log in to Sinequa via a form asking for your username and password (which must exist in a domain on the Sinequa back-end):
Your credentials are sent to the api/v1/webToken endpoint which returns a JWT directly. In the background, this is the process that is active:
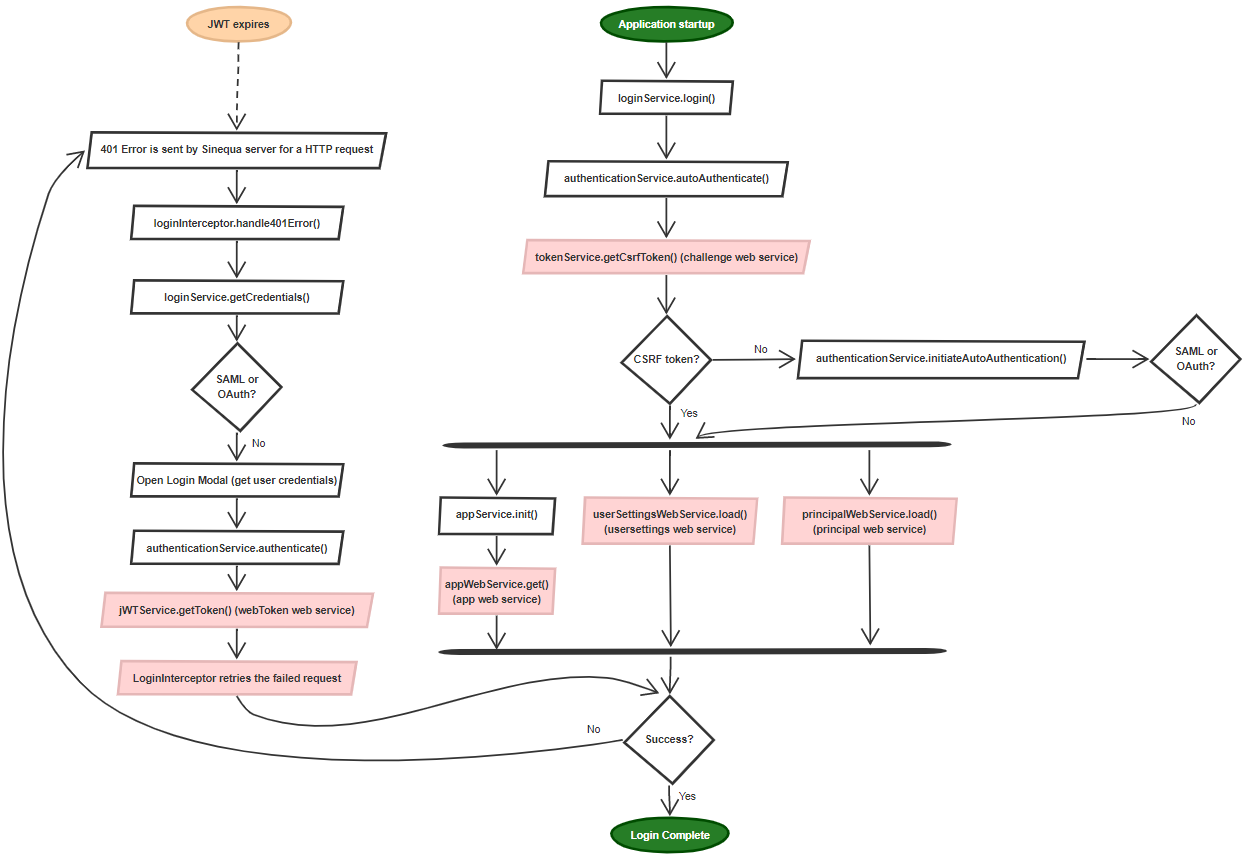
Notice that on application startup, the calls to the 3 web services (app, usersettings and principal) fail with a 401 error: This is what triggers the display of the login popup asking for your credentials. These errors are invisible to the user because the LoginInterceptor (on the left) has taken care of them. But if you have a look at the browser's inspector, you should see them nevertheless:

To set-up authentication via the default form, you must do the following:
-
On the Sinequa server, do not configure any auto-login method in the webapp.
-
In IIS, only enable Anonymous Authentication.
-
In your
app.module.ts, do not configure any auto-login provider. YourStartConfigshould look like:export const startConfig: StartConfig = {
app: "my-app",
production: environment.production
};(optionally with the
urlproperty to enable CORS) -
In development mode, you can use a proxy to avoid CORS issues. Run
ng serve <app name> --proxyConfig=./path/to/proxy.json, with the following configuration:proxy.json{
"/api": {
"target": "https://my-sinequa-server.com",
"secure": false,
"changeOrigin": true
},
"/xdownload": {
"target": "https://my-sinequa-server.com",
"secure": false,
"changeOrigin": true
}
}
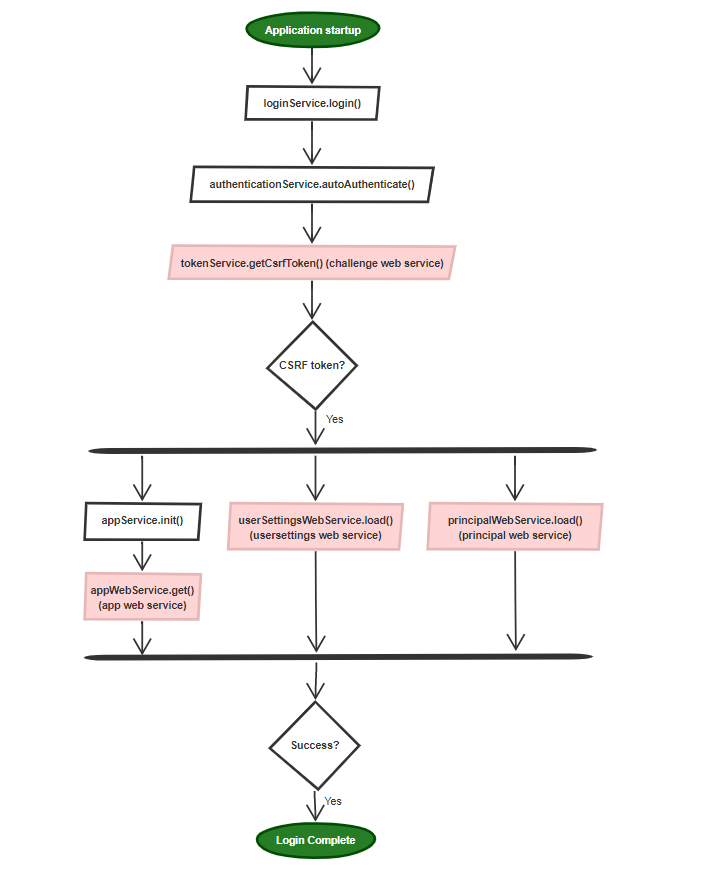
Windows Single Sign-On
Windows Single Sign-On (SSO) allows to use the fact that a user is already authentified by logging in to Windows, and that the browser can transmit their identity directly to the server.
One benefit of this approach is that all the work is managed by the Web Server (IIS). Therefore the application can send HTTP requests directly, without having to respond to 401 errors or exit the application.
The process is very much simplified:
The configuration of Windows SSO is documented in the official documentation.
If the SSO works for accessing the Sinequa administration, it should work for authenticating HTTP requests for a SBA deployed on the same WebApp.
Sometimes, however, the browser might prompt you for your credentials:

This can happen for various reasons, and can be quite erratic:
- The application may not be recognized as part of the intranet, and thus the credentials are not transmitted. To solve this, add the application URL to your Control Panel > Internet Options > Security > Local Intranet > Sites > Advanced.
- The problem may occur for the first requests, but after refreshing the page and/or cancelling the prompt, the problem eventually goes away (a symptom of this can be seen in you browser inspector (Network tab): sometimes some requests are successful (200) but others fail (401), causing the prompt).
When Windows SSO is enabled, do not configure any auto-login provider in your app.module.ts. Your StartConfig should look like:
export const startConfig: StartConfig = {
    app: "my-app",
    production: environment.production
};
Developers might get 401 errors when using ng serve with a regular proxy configuration. You must replace your proxy file (by default src/proxy.conf.json) by a JavaScript file with the following content (eg. src/proxy.conf.js):
const Agent = require('agentkeepalive').Agent;

module.exports = [
    {
        context: ["/api", "/xdownload"],
        target: "http://my-sinequa-server.com",
        secure: false,
        changeOrigin: true,
        agent: new Agent({
            maxSockets: 100,
            keepAlive: true,
            maxFreeSockets: 10,
            keepAliveMsecs: 100000,
            timeout: 6000000,
            keepAliveTimeout: 90000
        }),
        onProxyRes: proxyRes => {
            const key = "www-authenticate";
            proxyRes.headers[key] = proxyRes.headers[key] &&
                proxyRes.headers[key].split(",");
        }
    }
];
The above script is for a server accessed over HTTP. For HTTPS, replace Agent by HttpsAgent (3 occurrences)
And of course, update your ng serve command to reflect this new file:
npm run ng serve myapp -- --proxyConfig=./projects/myapp/src/proxy.conf.js
Windows SSO and CORS
If you need to enable Windows SSO with CORS, additional steps are needed:
-
To enable CORS, add the
urlof the Sinequa server in yourapp.module.ts, in theStartConfigobject. -
Dependencies: You need to install the following modules (IIS / Security):
- Windows Authentication
- URL Authorization
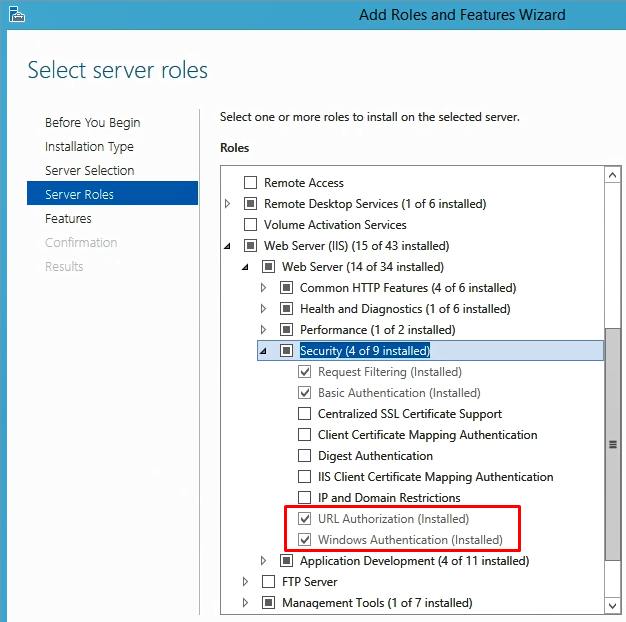
-
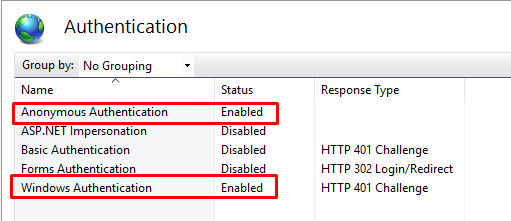
Configure your site Authentication: Enable both Anonymous and Windows Authentication
-
If not already done, enable CORS in your WebApp configuration from the specified origins (See Server configuration).
-
Add security rules into the web.config file
Go into the sinequa/website folder where your WebApplication is installed. Edit the
web.configfile: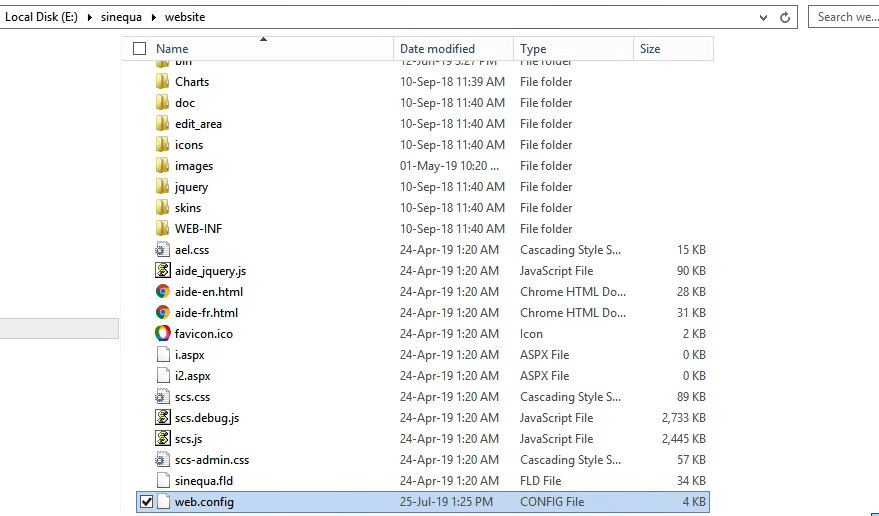
Add the following
<security>tag into the<system.webServer>tag:web.config.xml<security>
<authorization>
<remove users="*" roles="" verbs="" />
<add accessType="Allow" users="?" verbs="OPTIONS" />
<add accessType="Deny" users="?" verbs="GET, POST" />
<add accessType="Allow" users="*" verbs="GET, POST" />
</authorization>
</security>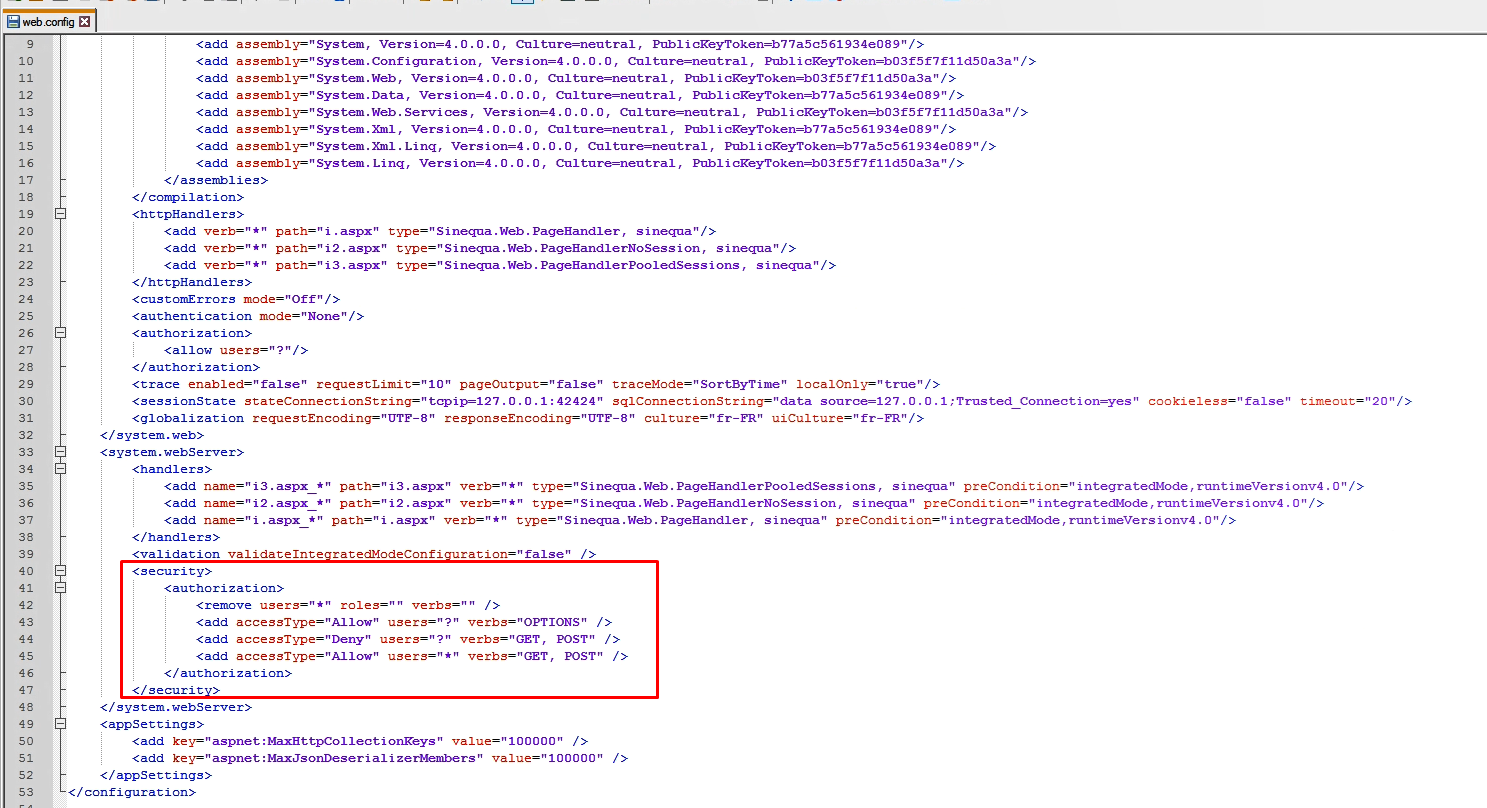
What it actually means:
- Allow
OPTIONSqueries for all anonymous users - Denied
GET/POSTqueries for all anonymous users (SoGETandPOSTwill be handled by the next rule) - Allow
GET/POSTqueries for all users (here authenticated users)
Why this configuration:
The Cross-Origin Resource Sharing standard works by adding new HTTP headers that let servers describe which origins are permitted to read that information from a web browser. Additionally, for HTTP request methods that can cause side-effects on server data (in particular, HTTP methods other than
GET, orPOSTwith certain MIME types), the specification mandates that browsers "preflight" the request, soliciting supported methods from the server with the HTTPOPTIONSrequest method, and then, upon "approval" from the server, sending the actual request. Servers can also inform clients whether "credentials" (such as Cookies and HTTP Authentication) should be sent with requests.When you fire an AJAX call to Sinequa REST API, two HTTP queries are sent (this is automatically done by your browser):
-
The "preflight" : Using
OPTIONMethod, will get the list ofAccess-Control-Allowin order to know if it can go to step #2. This first HTTP call is not passing any credential token in the HTTP headers so it'll be treated as "anonymous" by IIS -
Send the actual
GETorPOSTquery to the REST API using authentication in the HTTP headers
- Allow
:::warning Important note
Upgrading your Sinequa environment will override the web.config file. So it’s highly recommended to backup this file in the folder and replace the web.config file with the backup after an upgrade.
:::
SAML 2.0
The SAML 2.0 protocol is described in this picture (source: Wikipedia):
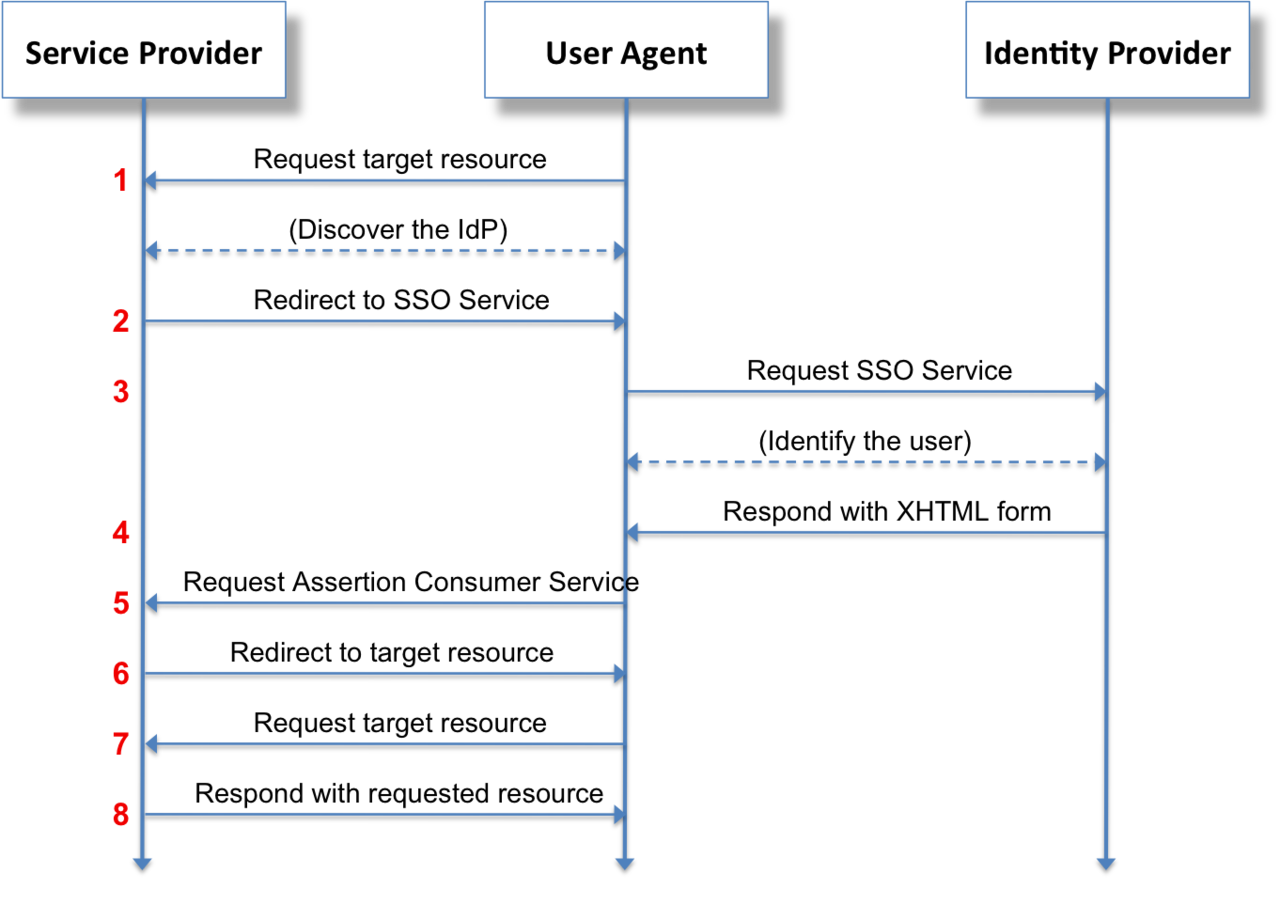
In the context of Sinequa:
- "Service Provider" is the Sinequa Server
- "User Agent" is the user
- "Identity Provider" is the SSO service able to authenticate the user on behalf of Sinequa
- 1: "Request target resource" is a HTTP request sent by the user to the Sinequa server, for example to search for content.
- 2/3: "Request SSO service" is Sinequa redirecting the user to the third party service, thus forcing the user out of the SBA (because he is not authenticated).
- 4/5: "Request Assertion Consumer Service" is the SSO service redirecting the user to the Sinequa server (in practice the URL is
<sinequa server>/saml/redirect). - 6/7: "Request target resource" is Sinequa redirecting the User to the SBA, thus going back to step 1, except this time Sinequa granted a Json Web Token (JWT) to the user, persisted in a Cookie (
sinequa-web-token-secure). Therefore, as long as this cookie doesn't expire, all the requests of the user will be properly authenticated. - 8: "Respond with request resource" if the user is indeed authenticated, Sinequa responds with the requested data (however if the JWT fails to be stored in a cookie, then we are back to step 2 and potentially will keep looping indefinitely)
In the front-end part of the SBA, the login process is as follows:

In the Sinequa administration, the configuration of the SAML 2.0 protocol involves various steps:
-
Configure an identity provider in your Sinequa WebApp Auto-Login tab (See the official documentation)
-
You can export the standard metadata required to configure the identity provider by clicking on the "Download metadata" button:

-
This standard metadata file can normally be imported in standard SAML providers (like MS ADFS), but the configuration can also be entered manually.
-
Add the name of the provider to your
app.module.ts(here we named it "identity"):export const startConfig: StartConfig = {
app: "my-app",
autoSAMLProvider: "identity",
production: environment.production
};
If your SBA is deployed on the Sinequa webapp, this configuration should enable you to log in to your application, just as you can log in to the Sinequa administration.
If your SBA is deployed on a different domain, CORS is active and you need to add the url of the Sinequa server to your StartConfig.
In development mode, you should use a proxy to avoid CORS issues. Run ng serve <app name> --ssl=true --proxyConfig=./path/to/proxy.json, with the following configuration:
{
    "/api": {
        "target": "https://my-sinequa-server.com",
        "secure": false,
        "changeOrigin": true
    },
    "/xdownload": {
        "target": "https://my-sinequa-server.com",
        "secure": false,
        "changeOrigin": true
    },
    "/saml/redirect": {
        "target": "https://my-sinequa-server.com",
        "secure": false,
        "changeOrigin": true
    }
}
However, the problem with using a proxy in this situation is that the JWT cookie will be associated with the Sinequa server URL (https://my-sinequa-server.com) instead of your proxy URL (https://localhost:4200). The requests (sent to the latter) will not be authenticated and the user will keep being redirected to the Identity Provider.
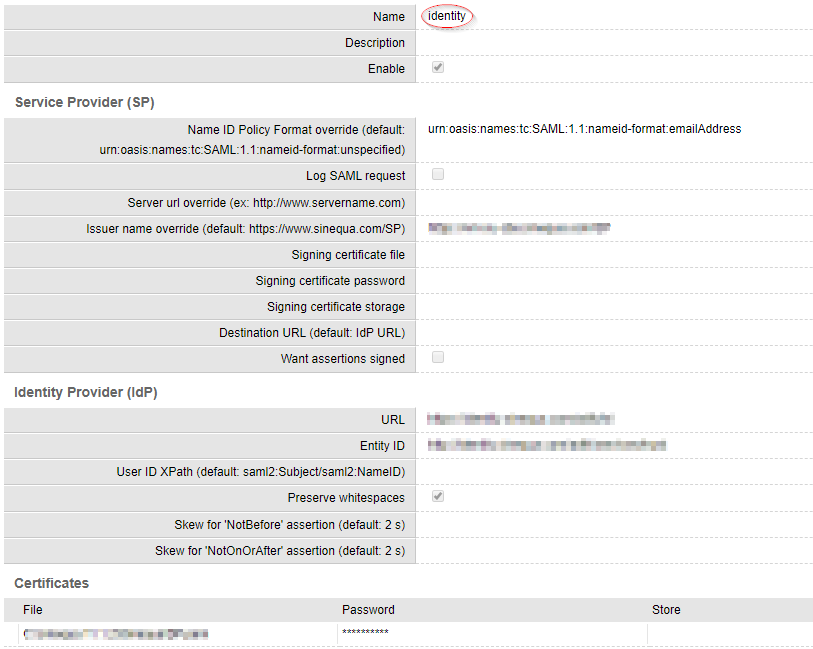
You therefore need to configure an alternative provider where the URL of the service is set to the proxy URL. In your Webapp configuration (Auto-Login tab), duplicate the provider and set the "Server url override" parameter to https://localhost:4200:
![]()
Then download the metadata file and add it to the configuration of your Identity Provider.
You can now use this new provider in your SBA with ng serve. Update the StartConfig to use this alternative provider (here called "identity-dev").
You can use the environment files to use "identity-dev" in development mode (with ng serve) and "identity" when the app is deployed on the server:
- development
- production
export const startConfig: StartConfig = {
  app: "my-app",
  autoSAMLProvider: "identity-dev",
  production: environment.production
};
export const startConfig: StartConfig = {
  app: "my-app",
  autoSAMLProvider: environment.autoSAMLProvider,
  production: environment.production
};
- development
- production
export const environment = {
  autoSAMLProvider: "identity-dev",
  production: false
};
export const environment = {
  autoSAMLProvider: "identity",
  production: true
};
OAuth2
OAuth is a protocol for managing "Access Delegation", which is used by websites to let users grant them access to their information. In practice, it is not used by Sinequa to access any information of the user, but simply for identifying them and granting them an identity token. The process is therefore very similar to SAML.
In the front-end part of the SBA, the login process is the same as SAML:
In the Sinequa administration, the configuration of the OAuth2 protocol involves various steps:
-
Configure an identity provider in your Sinequa WebApp (See the official documentation)

-
In the configuration of your OAuth identity provider (eg. Google SSO), include the URL of the Sinequa server (
https://my-sinequa-server.com/auth/redirect) as a redirection URL. -
Add the name of the provider to your
app.module.ts:
{`export const startConfig: StartConfig = {
    app: "my-app",
    autoOAuthProvider: "google",
    production: environment.production
};
If your SBA is deployed on the Sinequa server, this configuration should enable you to log in to your application, just as you can log in to the Sinequa administration.
If your SBA is deployed on a different server, CORS is active and you need to add the url of the Sinequa server to your StartConfig.
{`export const startConfig: StartConfig = {
    app: "my-app",
    autoOAuthProvider: "google",
    url: "https://my-sinequa-server.com",
    production: environment.production
};
In development mode, you should use a proxy to avoid CORS issues. Run ng serve <app name> --ssl=true --proxyConfig=./path/to/proxy.json, with the following configuration:
{
    "/api": {
        "target": "https://my-sinequa-server.com",
        "secure": false,
        "changeOrigin": true
    },
    "/xdownload": {
        "target": "https://my-sinequa-server.com",
        "secure": false,
        "changeOrigin": true
    },
    "/auth/redirect": {
        "target": "https://my-sinequa-server.com",
        "secure": false,
        "changeOrigin": true
    }
}
However, the problem with using a proxy in this situation is that the JWT cookie will be associated with the Sinequa server URL (https://my-sinequa-server.com) instead of your proxy URL (https://localhost:4200). The requests (sent to the latter) will not be authenticated and the user will keep being redirected to the Identity Provider.
You therefore need to configure an alternative provider where the URL of the service is set to the proxy URL. In your Webapp configuration (Auto-Login tab), duplicate the provider and set the "Server url override" parameter to https://localhost:4200:
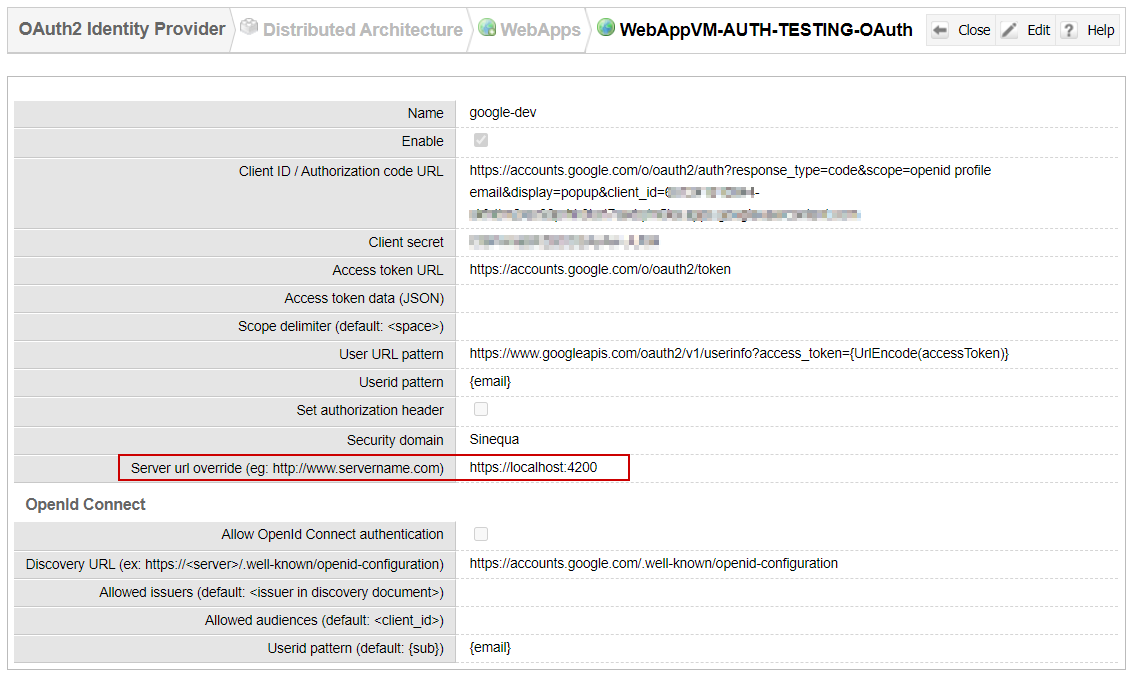
In the Identity Provider's configuration, you also need to add https://localhost:4200/auth/redirect as a valid redirection URL.
You can now use this new provider in your SBA with ng serve. Update the StartConfig to use this alternative provider (here called "google-dev").
You can use the environment files to use "google-dev" in development mode (with ng serve) and "google" when the app is deployed on the server:
- development
- production
export const startConfig: StartConfig = {
  app: "my-app",
  autoOAuthProvider: "google-dev",
  production: environment.production
};
export const startConfig: StartConfig = {
  app: "my-app",
  autoOAuthProvider: environment.autoOAuthProvider,
  production: environment.production
};
- development
- production
export const environment = {
  autoOAuthProvider: "google-dev",
  production: false
};
export const environment = {
  autoOAuthProvider: "google",
  production: true
};
Custom Authentication
In some situations, authentication is taken care of by a process independent of Sinequa. The identity of the user is known, and we would like the HTTP requests sent to Sinequa to be automatically authenticated. This situation can occur when users go through a reverse proxy or API gateway: The proxy takes care of authentication and users never directly talk to the Sinequa server.
In this case, we need to add the user's identity to our HTTP requests, and catch this identity in Sinequa with a WebAppPlugin. One solution can be to forward an authentication token to Sinequa and decrypt it on the server to get the identity of the user.
The plugin might look as follows. Note that GetLoginInfo() is called for every HTTP request, so it needs to be relatively fast (it can be slow on the first call, to store some information in cache, and then fast for the following requests):
namespace Sinequa.Plugin
{

    public class CustomAuthenticationPlugin : WebAppPlugin
    {

        public override LoginInfo GetLoginInfo(IDocContext Ctxt)
        {
            // The HttpManager can provide any information about the current HTTP request
            HttpManager hm = Ctxt.Hm;

            // We can also get information from a URL query parameter with Hm.Request(<name>)
            // or from a cookie with Hm.RequestCookieGet(<name>)
            string head  = hm.RequestHeader("Authorization");

            // Then we need to obtain the identity of the user somehow
            string userid = decryptHeader(head);

            // The identity might not be determined, in which case returning `null` results in a 401 error
            if(userid == null) return null;

            // The user id was determined, so we return a LoginInfo object
            LoginInfo login = new LoginInfo();
            login.UserInfo = userid;
            return login;
        }

    }

}