Routing
Typical Angular applications have multiple routes. Routes allow to separate functionality into specific components that are served with specific URL schemes.
SBA are no exception. In a complex Enterprise Search app, we might have routes for:
- A home page
- A search page
- The document preview
- An "Expert Finder"
- Other Enterprise-specific applications
- etc.
In this tutorial, we are going to refactor our app to have 2 routes and 4 components:
- The App component is going to host our router outlet.
- The Search component is going to be equivalent to the current component we have at the moment.
- The Home component is going to be our home page.
- The Search form component (containing the one from
@sinequa/componentswith the autocomplete you created) will be displayed on both the home page and the search page.
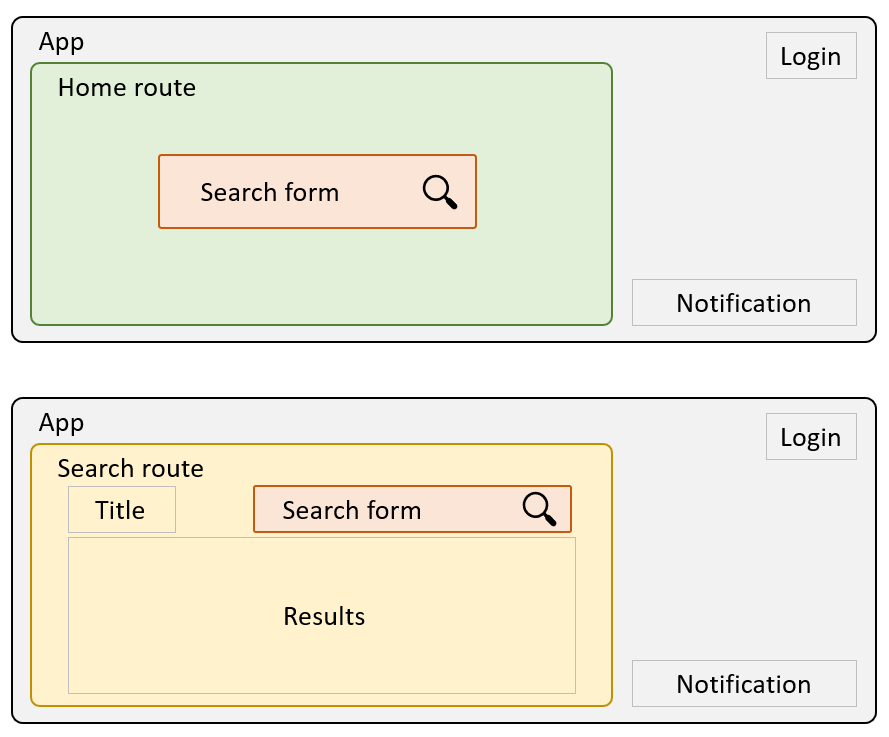
Our app will have four components and two routes
Creating the new components
In a terminal cd into src/app/ and run the following commands:
ng generate component home
ng generate component search
ng generate component search-form
(Use npm run ng if Angular CLI is not installed globally)
Note that Angular took care of add these new components to our app.module.ts, but you have a conflict with the SearchFormComponent from @sinequa/components. You can fix it by creating an alias for it in the imports:
import { SearchFormComponent as AppSearchFormComponent } from './search-form/search-form.component';

@NgModule({
    ...
    declarations: [
        ...
        AppSearchFormComponent
Refactoring
-
Open your
app.component.tsandapp.component.html, and move all of their respective content tosearch.component.tsandsearch.component.html, except for the login (buttons and respective methods) and notifications management (the notification container and its deleteNotification method) as they need to be on all routes. ⚠️ Be careful not to overwrite components class names and Angular selector with a copy-paste! -
Add the
router-outlettoapp.component.html. You should have something like this (note that we positioned the notifications withposition: fixedin the bottom right):app.component.html<router-outlet></router-outlet>
<button *ngIf="loginService.complete" type="button" (click)="logout()">{{ msg#app.logout | sqMessage }}</button>
<button *ngIf="!loginService.complete" type="button" (click)="login()">{{ msg#app.login | sqMessage }}</button>
<ng-container *ngIf="notificationsService.notificationsStream | async as notification">
<div *ngIf="deleteNotification(notification)" class="notification position-fixed" style="bottom: 5px; right: 5px; width: 500px">
<div *ngIf="notification.title" class="title">
<span>{{notification.title | sqMessage}}</span>
<hr>
</div>
<div>{{notification.text | sqMessage:{values: notification.params} }}</div>
</div>
</ng-container> -
In your
app.module.ts, define two routes corresponding to our two new components:app.module.ts@NgModule({
imports: [
...
RouterModule.forRoot([
{path: "home", component: HomeComponent},
{path: "search", component: SearchComponent},
{path: "**", redirectTo: "home"}
]),You should see:

-
Open your
search.component.htmland migrate all the<sq-search-form>element to thesearch-form.component.html. Don't forget to add theSearchServicedependency in the component's constructor.Remove the
searchRouteinput from<sq-search-form>since we now want the route to be "search". -
Insert the new search form in the
search.component.html, where the<form>used to be:search.component.html...
</nav>
<app-search-form></app-search-form> -
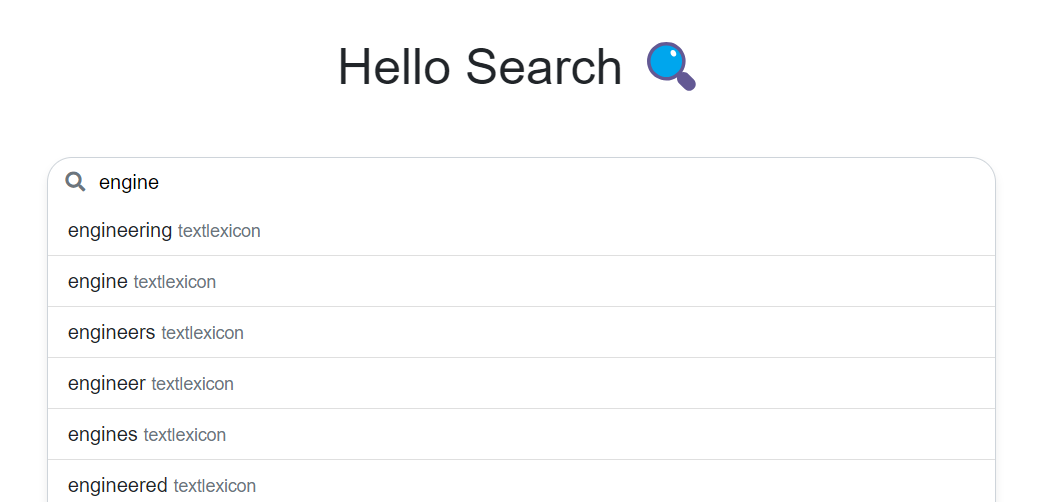
Also insert the search form in your
home.component.htmlwith a little formatting to make it look good:home.component.html<div class="vh-100 w-100 d-flex flex-column justify-content-center align-items-center">
<h1 class="mb-5">Hello Search 🔍</h1>
<div class="w-50 position-relative mb-5">
<app-search-form></app-search-form>
</div>
</div>This should now look like this:
-
Modify the
search()method inautocomplete.tsto also redirect on the "search" route:autocomplete.tssearch() {
...
this.searchService.searchText("/search");
} -
When you perform a search, upon hitting Enter or clicking on an autocompletion suggestion, you are now indeed redirected to the "search" route, but the search result does not appear. To fix this, in your
app.module.tstell your Search module thatsearchis a search route:app.module.tsBsSearchModule.forRoot({routes: ['search']}), -
At this point, your app should work, but once on the Search component, it is impossible to come back to the Home component. Let's add a router link on the "Hello Search" Title:
<a [routerLink]="['/home']" class="mr-auto">
    <h1>Hello Search 🔍</h1>
</a>
Adding new routes
The refactoring above is relatively complicated because we decided to add routes to a single-component app. More realistically, your app would have multiple routes from the start.
Adding new routes to an existing SBA is fairly simple:
- Create a new component (manually or with
ng generate componentas above) - Wire the component to your routes in your
app.module.ts, as in step 3. above. - Then create links from you existing routes to the new route:
- Either via HTML, with a router link (as above in step 9)
- Or programmatically, using
router.navigate()(which is what theSearchServiceis doing in step 7 above)
- If you want the
SearchServiceto be active on your route (resolve search queries based on the URL), add the route to the list passed to theBsSearchModule(as in step 8 above). Note that theSearchServicedoes not have to be tied to routing. You can deactivate that by passing adeactivateRouting: trueparameter to the service, via theBsSearchModule.forRoot()method.